How to set up mutt (text-based mail client) with Gmail?
A step-by-step guide to configure your terminal mail client!
What, When and Why?
Well if you are a beginner like me and have been living in this illusion that we have to open the browser client to send and receive emails then this blog is to tell you that you are not alone!
Till the time I started my tryst with sending Linux Kernel Patches, even I didn’t know that a thing like text-based mail client existed, lol! 😆
In this step-by-step guide, I will tell you how you can enjoy all your mailing powers straight from the command-line!
But hey, you must be wondering why to use text-based mail clients et al?
Two reasons:
-
To have just some aesthetic fun to show off to your friends that “Hey look, I am a Hacker! Mailing you straight from my green Terminal 😝”
-
Or get into some serious Linux Kernel Development kinda business where you are not expected to send HTML emails and base64 attachments. Well to tell you the secret — entire Linux kernel is developed and maintained over emails. So you know now how important an email client becomes 😄
There are many Command-Line mail clients but I have chosen mutt to help you set up with your Gmail account. Wondering why mutt?
Well, I will use the** official slogan of mutt** to answer that:
“All mail clients suck. This one just sucks less.”
The Steps (For Ubuntu 18.04 and above)
Enough of Introduction! Let’s start with the steps!
Step 1: Install mutt.
sudo apt-get install mutt
Step 2: Create directories for mutt to store the cache message headers and bodies, and store certificates, by entering the following commands:
mkdir -p ~/.mutt/cache/headers
mkdir ~/.mutt/cache/bodies
touch ~/.mutt/certificates
Step 3: Create a configuration file of mutt: muttrc
touch ~/.mutt/muttrc
Step 4: Open muttrc file in your favourite editor:
To open muttrc file in vim :
vim ~/.mutt/muttrc
After opening it, just copy-paste the below code and replace it with your email id and password wherever implied.
# ================  IMAP ====================
set imap_user = yourusername@gmail.com
set imap_pass = yourpassword
set spoolfile = imaps://imap.gmail.com/INBOX
set folder = imaps://imap.gmail.com/
set record="imaps://imap.gmail.com/[Gmail]/Sent Mail"
set postponed="imaps://imap.gmail.com/[Gmail]/Drafts"
set mbox="imaps://imap.gmail.com/[Gmail]/All Mail"
set header_cache = "~/.mutt/cache/headers"
set message_cachedir = "~/.mutt/cache/bodies"
set certificate_file = "~/.mutt/certificates"
# ================  SMTP  ====================
set smtp_url = "smtp://yourusername@smtp.gmail.com:587/"
set smtp_pass = $imap_pass
set ssl_force_tls = yes # Require encrypted connection

# ================  Composition  ====================
set editor = "vim"      # Set your favourite editor.
set edit_headers = yes  # See the headers when editing
set charset = UTF-8     # value of $LANG; also fallback for send_charset
# Sender, email address, and sign-off line must match
unset use_domain        # because joe@localhost is just embarrassing
set realname = "Your Name"
set from = "yourusername@gmail.com"
set use_from = yes
This is a very minimal working configuration which you can, later on, modify as per your choice. Save the above file and exit.
Step 5: In order to allow mutt work with Gmail you need to go to Less secure app access and ensure that you have this setting.
Allow less secure apps: ON
Step 6: Well, you are all set now to hit mutt straight from the terminal and get started with mails on the terminal ✔️
mutt
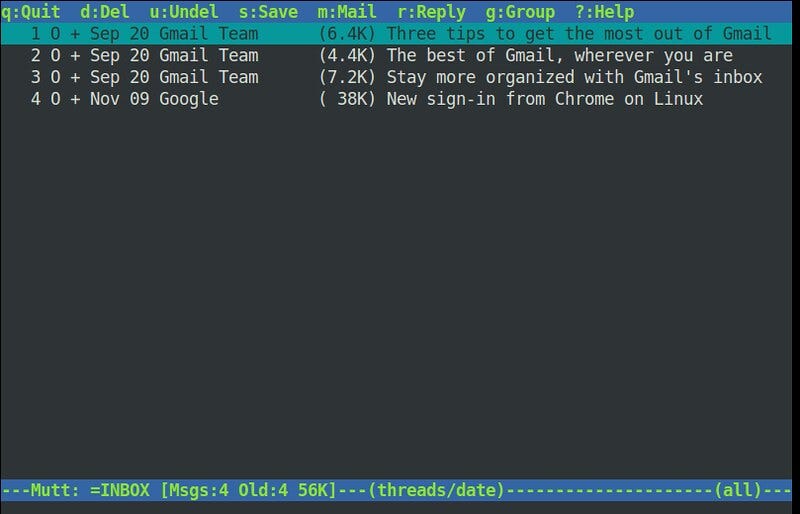
And then you will have a screen somewhat like this in your terminal 👇

Getting Started with mutt
Let me help you also send you your first non-HTML email from Terminal to yourself 👈
-
Press m
-
You will have a question something like this:
Recall postponed message? ([yes]/no):
Enter no and proceed. In the To: section write your email id.
-
Enter the Subject now and after that the editor you have written in the muttrc file must come up. Type the Body of the email. Save the changes and quit.
-
You will have a screen in mutt that will ask for your confirmation to send it. Press y .
-
It’s done! You have sent your first email and now you can quit mutt by pressing q
So, it’s a wrap for now and I am sharing with you all a mutt cheatsheet which I know you will not regret to use to make your muttway smooth!
For any queries and feedback, you can post your responses below and as well as can reach out to me on :
Twitter: https://twitter.com/mritunjay394 (preferable)
Linkedin: https://www.linkedin.com/in/mritunjay394/